Deforum Camera Animator
Getting started
After you download the add-on zip file, open blender and go to Edit>Preferences
If you do not have Blender, go here to download it.

In the Preferences menu, Go to
Add-ons, then click on Install.

Locate the zip file you downloaded, select it, then click on Install add-on.


Tick the box next to the add-on to enable it.
Press N on your keyboard to open the side panel where you will find the Deforum Tools Panel.

Make sure you width, height, and frames per second match your deforum settings.
High Level instructions inside blender.
This website.
Video tutorial - always update to date.
These will open the scene and also reset the scene. Two options right now, default and city. These are just to help you not get lost in 3D space.
Step 1: Start recording. This will put you into the camera view.
Step 2: Once the timer reaches zero, begin moving your camera around.
Use your WASD or arrow keys and mouse to move around. Use the scroll wheel to go faster or slower.


OR

up faster.
Down slower
This will smooth the keyframes to make the animation smoother. Type in a value and press smooth it. The higher and more times you press the button, the smoother it will get.
You can scroll through the key frames here, this could come in handy when you want to know the keyframe of a certain point in the animation to use in your text prompt.
After your recording, this will display total number of keyframes to use in the Max Frames area of deforum.
You can review your animation here. Press to play/stop.

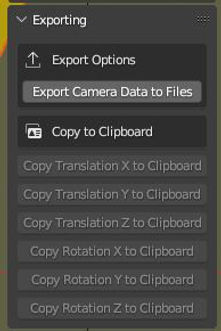
Export Camera Data to Files will export text files of each translation and rotation.
For faster use, you can copy the values straight to the clipboard and paste them into the correct fields in deforum.


Note: These will be grayed out till after you animate.
Here is a video tutorial. It does not include some update's so stay tuned for a new video soon.
.png)